
How to Modify Your Home for Aging in Place
Updated on: August 24th, 2026

Make Your Home More Comfortable and Accessible
As we get older or our mobility needs change, everyday tasks around the home can become more difficult. A step at the front door, a narrow hallway, or a bathroom that is hard to move around in can make it harder to get through the day safely and independently.
The good news is that many homes can be changed to make everyday life easier. Some updates are simple, such as removing a trip hazard or changing a doorknob. Others, such as adding a wheelchair ramp or remodeling a bathroom, require more planning. The right changes can help you or a loved one move around the home more comfortably, safely, and confidently.
This guide covers common home modifications for people with limited mobility, including wheelchair users, older adults, caregivers, and anyone planning to age in place. It also explains important measurements, accessibility guidelines, and ways to plan larger projects.
Understanding Home Accessibility
Before making changes to your home, it helps to understand what accessibility means. Accessibility is about making a home easier for people with different abilities to use. A home does not have to look or feel clinical to be accessible. Many changes can blend naturally into the home while making everyday activities much easier.
Accessibility can include changes that help with movement, vision, hearing, memory, communication, and other needs.
Four Types of Accessibility
When looking at ways to make a home more accessible, consider these four areas:
- Physical Accessibility: These changes remove barriers that make it difficult to move through the home. Examples include step-free entrances, wider doorways, accessible bathrooms, and wheelchair ramps.
- Sensory Accessibility: These changes can make the home easier to navigate for people with vision or hearing limitations. Examples include high-contrast step edges, tactile signs, visual smoke alarms, and doorbell alerts.
- Cognitive Accessibility: These changes can make a home easier to understand and navigate for people with memory or cognitive challenges. Simple labels, easy-to-use controls, and safety shut-offs for appliances can all help.
- Communication Accessibility: Technology and other tools can help people with speech or hearing limitations communicate and interact with their home. Some smart home devices can also make everyday tasks easier.
Universal Design vs. Accessible Design
Accessible design usually refers to changes made to meet the needs of someone with a specific mobility or accessibility need. A wheelchair ramp or stairlift is a good example.
Universal Design takes a broader approach. It means creating spaces that are easier for people of many ages and abilities to use without needing special changes. Open floor plans, step-free entrances, and lever-style door handles are examples of features that can benefit older adults, children, wheelchair users, and caregivers alike.
ADA Guidelines and Residential Wheelchair Accessibility
When planning a wheelchair-accessible home, the Americans with Disabilities Act (ADA) can be a helpful resource. The ADA provides design standards for public and commercial spaces, including requirements for wheelchair ramps. For more information about ramp requirements, see ADA Specifications for Wheelchair Ramps.
Private single-family homes are generally not required to follow ADA standards. However, these guidelines can still be helpful when planning a home modification. Using them as a starting point can help you avoid creating spaces that are too narrow, difficult to use, or unsafe.
Important Measurements for Wheelchair Users
Good measurements can make a major difference in how easy a home is to navigate. Some important measurements to keep in mind include:
- Clear Floor Space: A wheelchair generally needs at least 30" by 48" of clear floor space to allow the user to remain stationary and reach forward or to the side. This can affect where furniture, appliances, bathroom fixtures, and other items are placed.
- Turning Space: A wheelchair generally needs about 60" of open space to make a full turn. In smaller areas, a T-shaped turning space can provide another option. Without enough room to turn, a wheelchair user may have to back out of a bathroom, kitchen, or other room, which can make navigating the space more difficult.
- Reach Ranges: Items such as light switches, thermostats, outlets, and shelves should be placed where they can be reached comfortably from a seated position. A typical maximum forward reach is about 48", while a low forward reach is about 15".
Exterior Accessibility: Creating Step-Free Entries
For many people, the front door is the first major accessibility challenge. Steps and raised entryways can prevent someone using a wheelchair, walker, or scooter from entering the home without assistance.
Creating a step-free entrance can make a huge difference in someone's ability to come and go from their home. Depending on the home and the available space, this may mean installing a wheelchair ramp, a threshold ramp, or another accessibility solution.
Wheelchair Ramps: Choosing the Right Length and Design
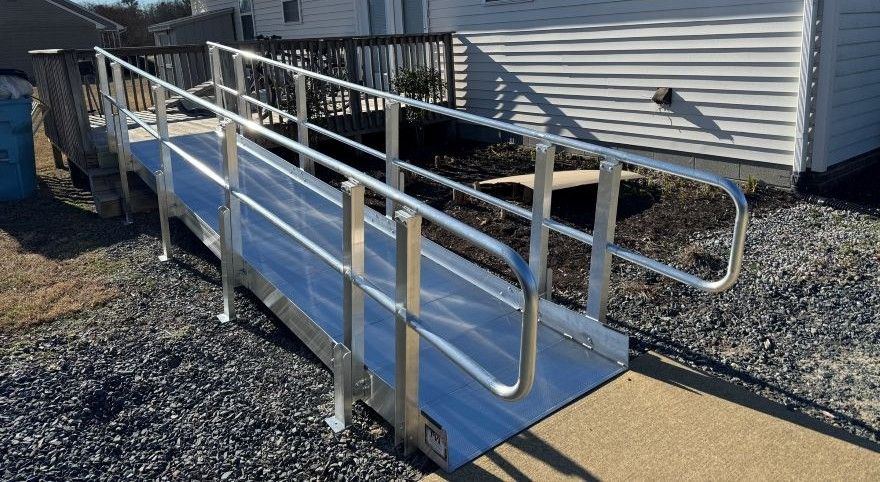
Installing a wheelchair ramp is one of the most common ways to create a step-free entrance. However, the ramp needs to be properly sized and installed. A ramp that is too steep can be difficult to use and may increase the risk of an accident.
The ADA uses a 1:12 slope as a standard for wheelchair ramps. This means that for every 1" of vertical rise, the ramp should have 12" of horizontal run. For example, a 24" rise would require a ramp that is at least 24' long when following a 1:12 slope. For help determining the right ramp length for your entryway, see How to Determine Proper Wheelchair Ramp Length.
Wheelchair ramps may also need:
- A minimum clear width of 36".
- Level landings at the top and bottom of the ramp, typically 60" by 60", to give users room to stop, turn, and operate doors safely.
- Resting platforms along longer continuous ramp runs.
- Handrails on both sides when required by the applicable guidelines.
- Edge protection to reduce the risk of wheelchair casters or mobility devices moving off the side of the ramp.
Navigating the Interior: Hallways, Doors, and Flooring

Getting through the front door is only the first step. Once inside, the home should provide enough room for a person using a wheelchair, walker, scooter, or other mobility aid to move from room to room comfortably.
Narrow hallways, tight corners, small doorways, rugs, and uneven flooring can all make daily movement more difficult. Fortunately, some of these problems can be addressed without a major renovation.
Widening Doorways and Using Offset Hinges
Many interior doorways are too narrow for comfortable wheelchair access. A doorway with at least 32" of clear width is commonly recommended, while 36" can provide more comfortable access.
Widening a doorway can be a larger remodeling project because it may involve changing the wall framing, header, door, and trim. If widening a doorway is not practical, offset or swing-clear hinges may provide another option. These hinges allow the door to swing farther out of the opening and can add about 2" of usable clearance.
Hallway Clearances and Turning Space
A straight hallway should provide enough room for the mobility device to pass through without bumping walls or furniture. A 36" clear width is a common guideline, but wider hallways may be needed when a wheelchair user needs to turn into a doorway.
When planning a hallway or rearranging furniture, think about the turning space needed for the mobility device. A little extra room around corners and doorways can make everyday movement much easier.
Accessible Flooring and Thresholds
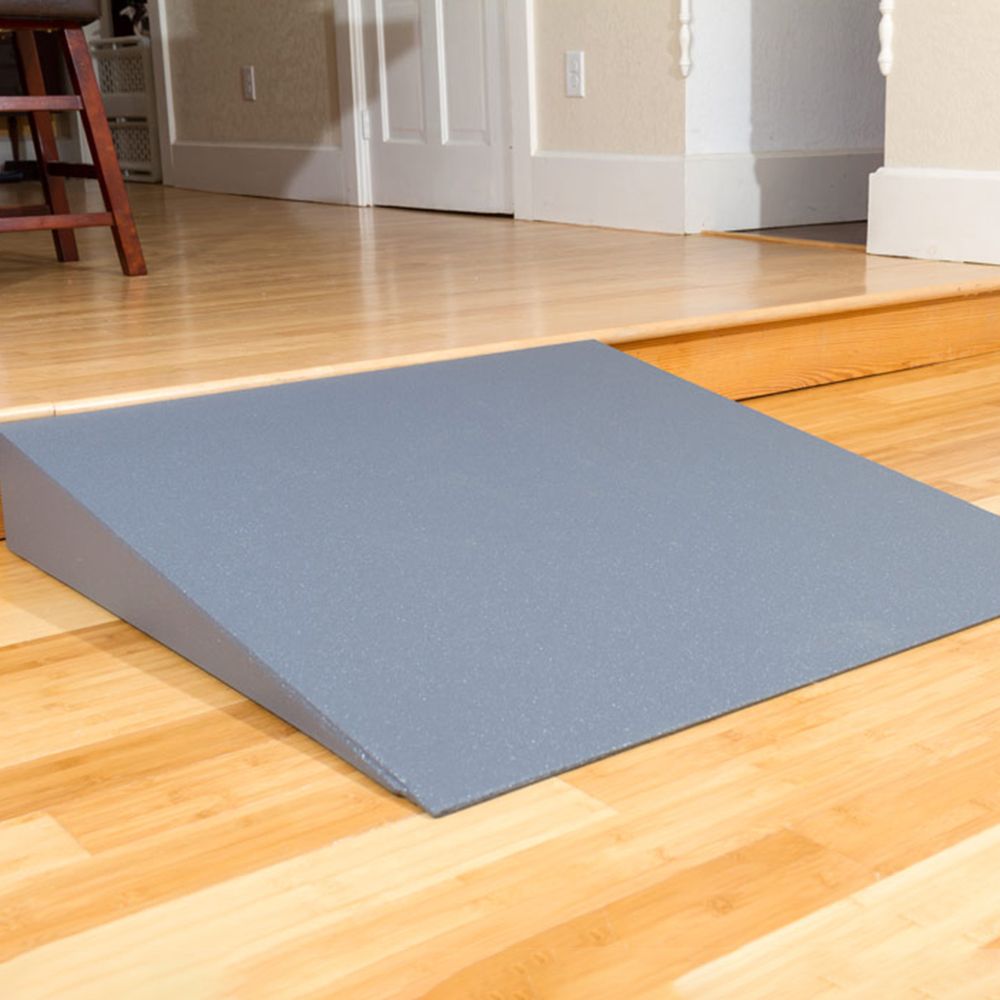
Flooring can also affect how easily someone moves around the home. Wheelchair users need surfaces that are easy to roll across, while people who use walkers or have an unsteady gait need flooring that reduces the risk of slipping or tripping.
- Carpet: Thick, soft carpeting can make it harder to push a manual wheelchair and can make power wheelchairs work harder. If carpet is used, low-pile carpet with firm padding is generally easier to navigate.
- Hard Surfaces: Hardwood, luxury vinyl plank (LVP), laminate, and tile can work well for mobility devices. However, very smooth or glossy surfaces can become slippery when wet. Textured or matte finishes may provide better traction.
- Transitions: Changes between flooring surfaces should be as smooth as possible. If there is a raised threshold, a small threshold ramp can provide a smoother transition for wheelchairs, scooters, walkers, and other mobility aids.
The Accessible Bathroom: Safety and Independence
The bathroom can be one of the most challenging rooms in the home for someone with limited mobility. Hard surfaces, water, tight spaces, and the need to move between sitting and standing can all increase the risk of slips and falls.
A few thoughtful changes can make the bathroom easier and safer to use while helping a person maintain as much independence as possible.
Roll-In Showers vs. Walk-In Tubs
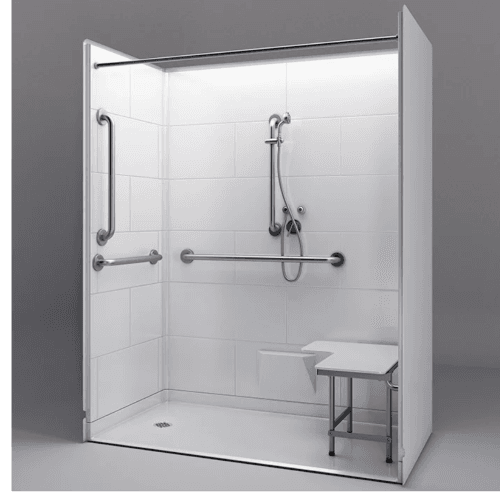
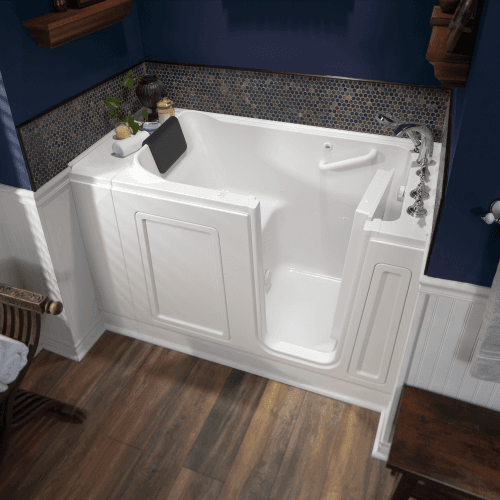
Standard bathtubs can be difficult to enter and exit for people with limited mobility. Two common alternatives are walk-in tubs and roll-in showers.
- Walk-In Tubs: Walk-in tubs have a door that allows the user to enter over a low threshold instead of stepping over the tall side of a standard bathtub. Many include built-in seating and handheld showerheads. They can be helpful for people who have difficulty with balance or stepping over a traditional tub wall. However, transferring from a wheelchair into the tub can still be difficult, and the user has to remain in the tub while it fills and drains.
- Roll-In Showers: Roll-in showers have little or no threshold, making them easier to enter with a wheelchair or rolling shower chair. A 36" by 36" space is a common minimum size, while a larger area may be needed if the user needs room to turn. Creating a true roll-in shower can require significant remodeling so the shower floor is level with the rest of the bathroom.
Grab Bars Provide Extra Support

Grab bars can provide valuable support when getting into or out of a shower, standing up, or sitting down. They are one of the most useful bathroom modifications because they can help a person maintain their balance during movements that might otherwise feel unsteady.
Grab bars should be securely attached to the wall. Standard drywall anchors may not provide enough support, especially if someone needs to rely heavily on the bar. Whenever possible, grab bars should be attached to wall studs or properly installed reinforcement behind the wall.
Grab bars can be installed horizontally, vertically, or in other positions depending on where support is needed. Their placement should be planned around the person who will use them and the movements they need help with.
Toilets and Transfer Spaces
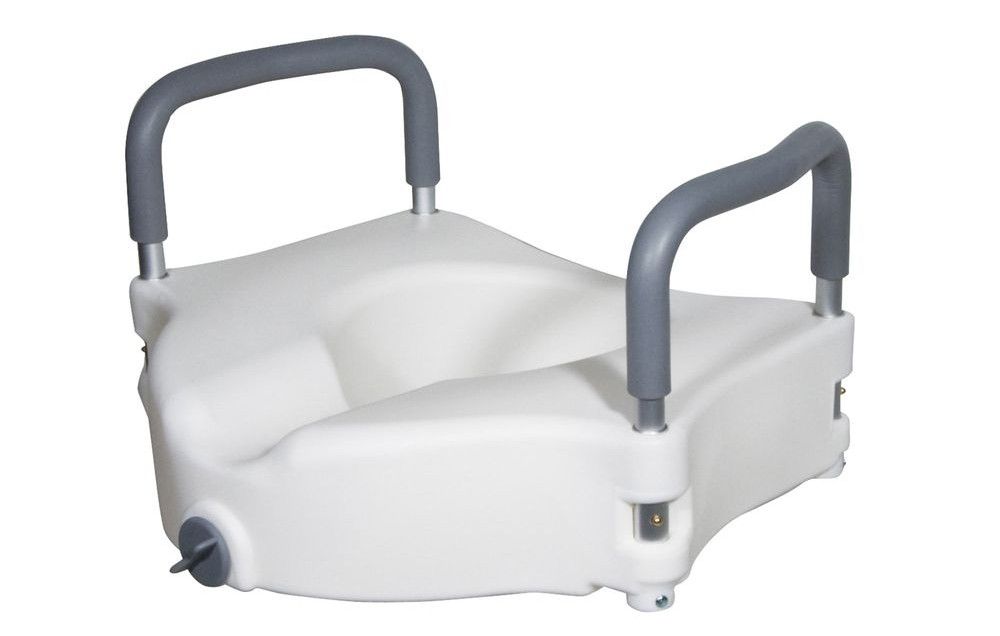
A toilet that is too low can make sitting down and standing up difficult, especially for someone with limited leg strength or joint pain. ADA-compliant toilets are generally higher than standard residential toilets, which can make transfers easier for many users.
A raised toilet seat or seat riser can also add height to an existing toilet without replacing the entire fixture. Support bars can provide another stable place to hold onto when sitting down or standing up.
It is also important to leave enough clear space beside the toilet for a wheelchair user to approach and transfer safely. Making sure the area around the toilet is not crowded with furniture or other items can make a noticeable difference.
Accessible Vanities and Sinks
Standard bathroom cabinets can prevent a wheelchair user from getting close enough to the sink. A wall-mounted sink or roll-under vanity can provide more room for a wheelchair underneath.
A roll-under vanity should provide enough knee and toe clearance for the user to get close to the sink. Any exposed plumbing should be protected so it does not cause burns or injuries. Faucets with single-lever controls or motion sensors can also be easier to operate than traditional two-handle faucets.
The Wheelchair-Accessible Kitchen: Functional Design
The kitchen is another area where small changes can have a big impact. Reaching into high cabinets, bending into low appliances, and moving around crowded counters can be challenging for someone using a wheelchair or dealing with limited mobility.
Multi-Level and Lowered Countertops
Standard kitchen countertops are usually about 36" high, which may be too high for comfortable food preparation from a seated position. Lowered work areas can make cooking and preparing food easier.
Some accessible kitchens use several countertop heights. A lower section can provide room for a wheelchair user, while standard-height sections can remain available for standing family members and caregivers. This is one example of Universal Design because it allows people with different needs to use the same kitchen.
Cabinetry and Storage Solutions
Items stored in high cabinets can be difficult or impossible for someone in a wheelchair to reach. Moving frequently used items to lower storage areas can make the kitchen much more convenient.
- Pull-Out Shelving and Drawers: Pull-out shelves and deep drawers bring stored items closer to the user and reduce the need to reach into the back of a cabinet.
- Pull-Down Shelving: Pull-down cabinet hardware can bring items from an upper cabinet down to a more comfortable height.
- Lazy Susans and Corner Storage: Rotating shelves and pull-out corner storage can make hard-to-reach spaces easier to use.
Appliance Selection and Placement
Where appliances are placed can be just as important as which appliances you choose.
- Ovens and Ranges: Front-mounted controls can be easier to reach than controls positioned behind hot burners. Wall ovens can also be installed at a height that is easier for the user to reach.
- Refrigerators: Side-by-side refrigerators and French-door models with lower freezer drawers can make both fresh and frozen foods easier to reach.
- Microwaves: Over-the-range microwaves can be difficult to reach from a seated position. A countertop microwave or microwave drawer may be a better option.
- Sinks: A shallow sink can provide more room for a wheelchair user's knees underneath while keeping the sink within comfortable reach.
Bedroom and Living Area Modifications
Not every accessibility improvement requires major construction. In bedrooms and living areas, rearranging furniture, improving clear space, and choosing the right furniture heights can make the home easier to navigate.
Bedroom Clearances and Bed Heights
Keep enough open space around the bed for a wheelchair or other mobility device. About 36" of clear space around the sides and foot of the bed can make it easier to move around and perform transfers.
Bed height is also important. A bed that is too low can make standing difficult, while a bed that is too high can make transferring from a wheelchair harder. Ideally, the bed height should work well with the user's wheelchair and transfer method. Adjustable beds can provide additional flexibility by allowing the height and position of the mattress to be changed.
Accessible Closets
Clothing rods in standard closets are often too high for someone using a wheelchair. Lowering the rods or installing pull-down closet hardware can make clothing easier to reach.
Closet doors can also get in the way. Curtains, wider doors, or swing-clear doors can make it easier to enter the closet and reach stored items.
Living Room Layouts and Smart Home Technology
Living spaces should have wide, clear paths that allow a wheelchair, walker, or other mobility aid to move around easily. Remove unnecessary furniture and consider the turning space needed to move between rooms.
Area rugs should be removed or securely fastened so they do not bunch up under wheelchair casters or create a tripping hazard. Furniture should also be easy to sit down on and stand up from. Very soft or deep sofas can be difficult for someone with limited mobility to use.
Smart home technology can also make everyday life easier. Voice-controlled assistants, smart thermostats, motorized blinds, and smart lighting allow people to control parts of their home without having to move across the room or reach difficult-to-access switches.
Multi-Level Living: Stairlifts and Home Elevators
Stairs can become a major barrier when someone has difficulty walking or uses a wheelchair. Moving to a single-story home is not always practical or desirable, so there are several ways to make different levels of a home more accessible.
Stairlifts: A Practical Way to Access Multiple Floors
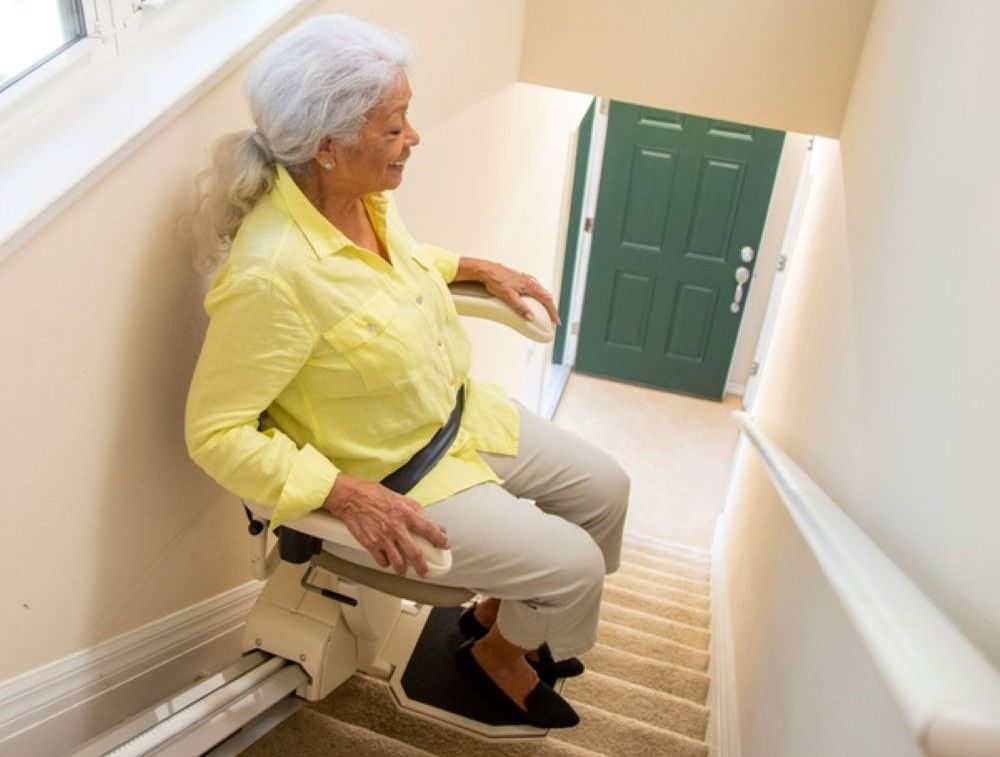
A stairlift is a motorized seat that travels along a rail installed on the stairs. For many homes, it can be a practical way to continue using multiple floors without climbing the stairs.
- Straight Stairlifts: These are designed for staircases without turns or curves. They can generally be installed more quickly than curved systems.
- Curved Stairlifts: These are designed for staircases with turns, curves, or intermediate landings. They require a custom rail designed to fit the staircase.
Keep in mind that a stairlift requires the user to transfer from their wheelchair onto the stairlift seat. A wheelchair is then needed on the other floor. Because of this, stairlifts may work best for people who can safely perform transfers or walk short distances.
Platform Lifts and Home Elevators
For people who cannot safely transfer out of a wheelchair, a platform lift or home elevator may be a better solution.
- Inclined Platform Lifts: These lifts travel along the staircase while carrying the user's wheelchair on a platform. They can be useful for people who need to remain in their wheelchair while moving between floors.
- Residential Elevators: A home elevator provides direct access between multiple levels without requiring the user to transfer from a wheelchair. Installing one in an existing home is a major construction project, but it can provide a long-term accessibility solution.
Financing Your Modifications: Grants, Medicare, and Assistance
Major home modifications can be expensive, so it is understandable to look for financial assistance. Depending on your situation, there may be federal, state, insurance, or nonprofit programs that can help cover some accessibility improvements.
Does Medicare Pay for Home Modifications?
Medicare generally does not pay for structural home modifications such as building a wheelchair ramp, widening a doorway, or installing a roll-in shower. For more information about wheelchair ramp funding, see Wheelchair Ramps and Medicaid/Medicare: Understanding Accessibility and Health Insurance.
Original Medicare Parts A and B can cover certain types of Durable Medical Equipment (DME) when it is prescribed for use in the home. Examples can include wheelchairs, hospital beds, patient lifts, and commode chairs. These benefits generally do not extend to permanent changes made to the home itself.
Some Medicare Advantage plans may offer additional benefits that help with certain home safety modifications. Because coverage varies by plan, check your specific plan documents to see what may be available.
Medicaid Waivers for Home Modifications
Medicaid may provide assistance for home modifications through Home and Community-Based Services (HCBS) waiver programs. These programs are designed to help eligible people receive care and services while continuing to live in their homes or communities.
Available benefits vary from state to state, but some programs may help with ramps, widened doorways, bathroom equipment, and other accessibility improvements. Eligibility requirements and waitlists also vary, so check with your state's Medicaid program for current information.
Veterans Affairs (VA) Grants
Veterans may have access to several VA programs that can help pay for home modifications. Eligibility and funding depend on the veteran's circumstances and the type of disability.
- Specially Adapted Housing (SAH) Grant: This program can provide significant funding for eligible veterans with severe service-connected disabilities who need substantial changes to their homes.
- Special Housing Adaptation (SHA) Grant: This program helps eligible veterans with certain service-connected disabilities make needed changes to their home.
- Home Improvements and Structural Alterations (HISA) Grant: This program can help eligible veterans pay for medically necessary improvements to their primary residence. Depending on eligibility, improvements may include changes to entrances, bathrooms, kitchens, and other areas of the home.
Step-by-Step Guide: How to Evaluate and Modify Your Home

Making a home more accessible is easier when you take the time to plan. Instead of changing everything at once, start by identifying the areas that create the biggest safety or accessibility challenges.
Step 1: Get a Professional Assessment
For larger accessibility projects, consider speaking with an Occupational Therapist (OT) or a Certified Aging-in-Place Specialist (CAPS). An OT can look at how a person moves through the home and identify challenges that may not be obvious to family members.
A professional assessment can also help you think beyond the most obvious problem. For example, you may know that you need a ramp, but an assessment may also identify difficult door hardware, slippery flooring, poor lighting, or a lack of turning space.
Step 2: Hire the Right Contractor
For major remodeling projects, look for contractors who have experience with accessible home design. A contractor familiar with aging-in-place modifications will understand the importance of clear floor space, accessible doorways, bathroom safety, and other details that can make a home easier to use.
Ask potential contractors about their experience with accessibility projects and request examples of similar work they have completed.
Step 3: Prioritize the Most Important Changes
If your budget does not allow you to complete every modification at once, focus first on the changes that have the biggest impact on safety and daily life.
- Phase 1 (Immediate Safety and Access): Start with changes that allow the person to safely enter and exit the home and use the bathroom. This may include installing a ramp, improving the front entrance, widening a bathroom doorway, adding grab bars, or creating a safer shower.
- Phase 2 (Daily Living and Independence): Next, focus on areas that make everyday activities easier, such as lowering kitchen counters, improving storage, adjusting closet rods, and removing difficult flooring.
- Phase 3 (Long-Term Comfort and Convenience): Finally, consider larger convenience improvements such as smart home technology, stairlifts, elevators, or other long-term accessibility solutions.
Thoughtful Home Modifications Can Make Aging in Place Easier

Making a home more accessible does not have to happen all at once. The most important step is to identify the areas that are making everyday activities difficult or unsafe and then choose changes that address those needs.
Simple updates, such as removing trip hazards, improving lighting, changing door hardware, or adding a threshold ramp, can make a noticeable difference. Larger projects, such as installing a wheelchair ramp, remodeling a bathroom, or adding a stairlift, can provide even greater access and independence.
With thoughtful planning, the right accessibility products, and help from experienced professionals when needed, many homes can be made more comfortable and easier to navigate. Whether you are preparing your own home for the future or helping a loved one stay independent, the right modifications can help make aging in place a safer and more comfortable experience.
If you would like assistance selecting accessibility products to make your home safer and more comfortable for aging in place, please contact us or call us at 866-887-1001.